Different Price Ranges
The way we implemented it, our Pool contract creates only price ranges that include the current price:
// src/UniswapV3Pool.sol
function mint() {
    ...
    amount0 = Math.calcAmount0Delta(
        slot0_.sqrtPriceX96,
        TickMath.getSqrtRatioAtTick(upperTick),
        amount
    );

    amount1 = Math.calcAmount1Delta(
        slot0_.sqrtPriceX96,
        TickMath.getSqrtRatioAtTick(lowerTick),
        amount
    );

    liquidity += uint128(amount);
    ...
}
From this piece, you can also see that we always update the liquidity tracker (which tracks only currently available liquidity, i.e. liquidity available at the current price).
However, in reality, price ranges can also be created below or above the current price. That’s it: the design of Uniswap V3 allows liquidity providers to provide liquidity that doesn’t get immediately used. Such liquidity gets “injected” when the current price gets into such “sleeping” price ranges.
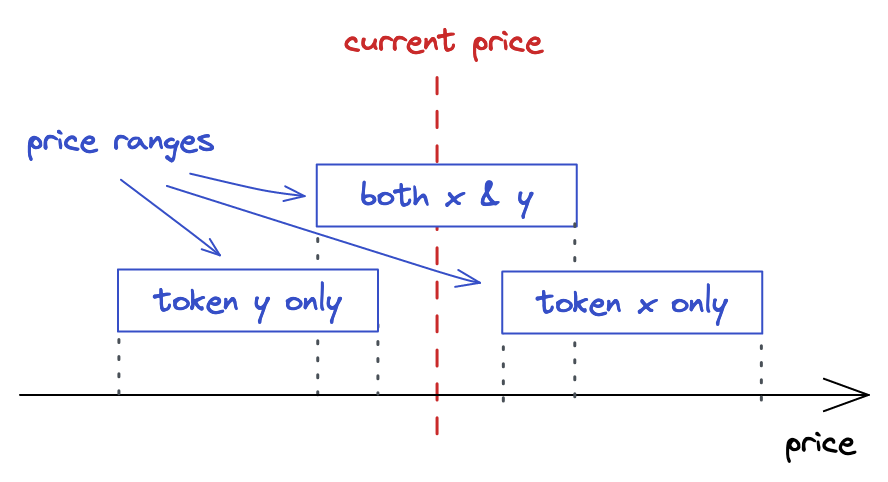
These are kinds of price ranges that can exist:
- Active price range, i.e. one that includes the current price.
- Price range placed below the current price. The upper tick of this range is below the current tick.
- Price range placed above the current price. The lower tick of this range is above the current tick.
Limit Orders
An interesting fact about inactive liquidity (i.e. liquidity not provided at the current price) is that it acts as limit orders.
In trading, limit orders are orders that get executed when the price crosses a level chosen by the trader. For example, you can place a limit order that buys 1 ETH when its price drops to $1000. Similarly, you can use limit order to sell assets. With Uniswap V3, you can get similar behavior by placing liquidity at ranges that are below or above the current price. Let’s see how this works:
If you provide liquidity below the current price (i.e. the price range you chose lays entirely below the current price) or above it, then your whole liquidity will be composed of only one asset–the asset will be the cheaper one of the two. In our example, we’re building a pool with ETH being token and USDC being token , and we define the price as:
If we put liquidity below the current price, then the liquidity will be composed of USDC solely because, where we added the liquidity, the price of USDC is lower than the current price. Likewise, when we put liquidity above the current price, then the liquidity will be composed of ETH because ETH is cheaper in that range.
Recall this illustration from the introduction:
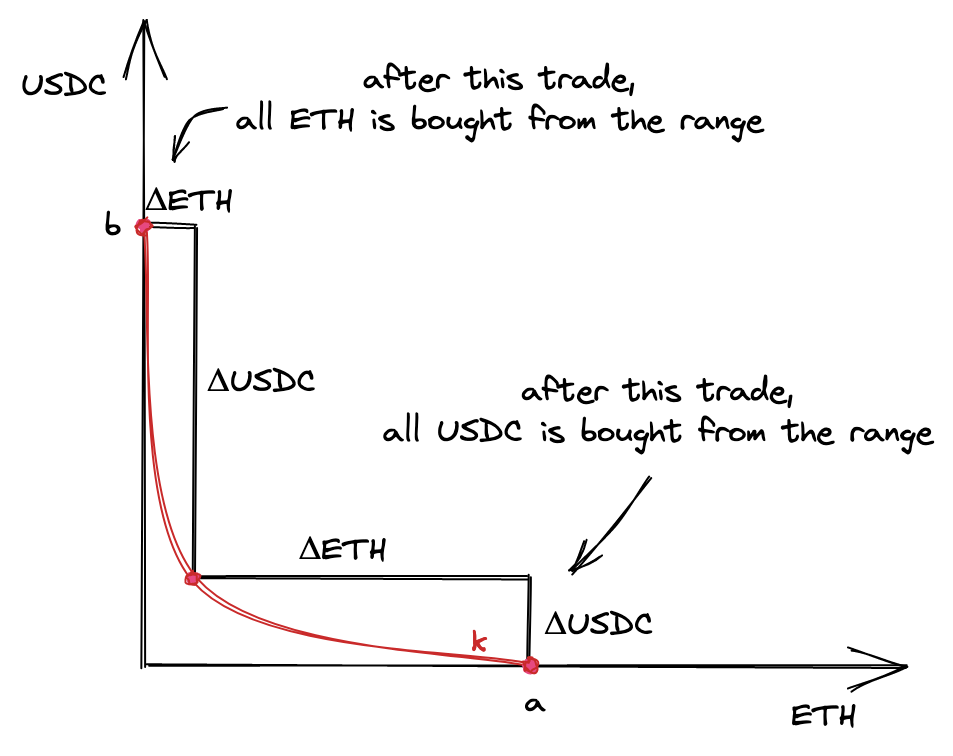
If we buy all available amounts of ETH from this range, the range will contain only the other token, USDC, and the price will move to the right of the curve. The price, as we defined it (), will increase. If there’s a price range to the right of this one, it needs to have ETH liquidity, and only ETH, not USDC: it needs to provide ETH for the next swaps. If we keep buying and raising the price, we might “drain” the next price range as well, which means buying all its ETH and selling USDC. Again, the price range ends up having only USDC, and the current price moves outside of it.
Similarly, if we’re buying USDC tokens, we move the price to the left and remove USDC tokens from the pool. The next price range will only contain USDC tokens to satisfy our demand, and, similarly to the above scenario, will end up containing only ETH tokens if we buy all USDC from it.
Note the interesting fact: when crossing an entire price range, its liquidity is swapped from one token to another. And if we set a very narrow price range, one that gets crossed quickly during a price move, we get a limit order! For example, if you want to buy ETH at a lower price, you need to place a price range containing only USDC at the lower price and wait for the current price to cross it. After that, you’ll need to remove your liquidity and get it converted to ETH!
I hope this example didn’t confuse you! I think this is a good way to explain the dynamics of price ranges.
Updating the mint Function
To support all kinds of price ranges, we need to know whether the current price is below, inside, or above the price range specified by the user and calculate token amounts accordingly. If the price range is above the current price, we want the liquidity to be composed of token :
// src/UniswapV3Pool.sol
function mint() {
    ...
    if (slot0_.tick < lowerTick) {
        amount0 = Math.calcAmount0Delta(
            TickMath.getSqrtRatioAtTick(lowerTick),
            TickMath.getSqrtRatioAtTick(upperTick),
            amount
        );
    ...
When the price range includes the current price, we want both tokens in amounts proportional to the price (this is the scenario we implemented earlier):
} else if (slot0_.tick < upperTick) {
    amount0 = Math.calcAmount0Delta(
        slot0_.sqrtPriceX96,
        TickMath.getSqrtRatioAtTick(upperTick),
        amount
    );

    amount1 = Math.calcAmount1Delta(
        slot0_.sqrtPriceX96,
        TickMath.getSqrtRatioAtTick(lowerTick),
        amount
    );

    liquidity = LiquidityMath.addLiquidity(liquidity, int128(amount));
Notice that this is the only scenario where we want to update liquidity since the variable tracks liquidity that’s available immediately.
In all other cases, when the price range is below the current price, we want the range to contain only token :
} else {
    amount1 = Math.calcAmount1Delta(
        TickMath.getSqrtRatioAtTick(lowerTick),
        TickMath.getSqrtRatioAtTick(upperTick),
        amount
    );
}
And that’s it!